
- designed to securely hold and manipulate needles and the ends of suture material
Goal
- efficient use of needle holders while suturing (minimizing number of motions necessary to position, insert and extract the needle and tie a secure knot)
Skills to Practice
- holding needle holders with a wide-based tripod grip
- quick controlled opening and closing of locking mechanism
- controlled and smooth insertion and extraction of needle in the tissues (lab 3)
- secure, repeatable square knot formation using needle drivers (lab 2)
- efficient use of needle holders while suturing (minimizing number of motions necessary to position, insert and extract needle, tie a square knot)
Basics
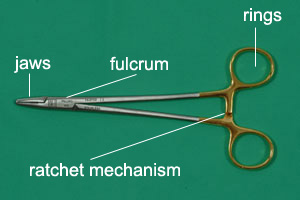
- most have ringed handles and a ratchet locking system
- jaws are wider and shorter than hemostats
- prone to wear because of frequent use of a variety of needle sizes (needle slips or rotates when inserted into the tissues)
Tungsten-carbide tips available for some designs
-
-
- strong metal insert with fine cross striations
- reinforces the tips so they last longer and securely hold a wider range of needle sizes
-

- various designs and sizes
- selection varies with intended use and surgeon preference
- size selected for needle and suture material
- large needle damages fine tips
- large tip bends or breaks fine needles
- length of handle used varies with location and depth of suturing
- size selected for needle and suture material
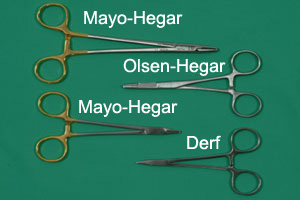
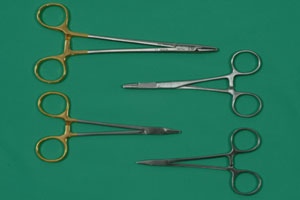
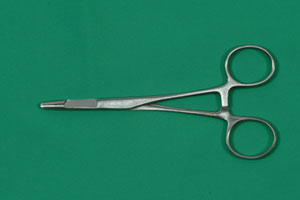
Mayo-Hegar Needle Holder
- short, strong jaws
- securely grasps variety of needle sizes
- durable
- comes in a variety of sizes
Olsen-Hegar Needle Holder
- combines needle holder and suture scissors
- suture can be placed and cut without changing instruments
- useful for surgeons operating alone
- combination tip is less durable across range of needle sizes
- can inadvertently cut the suture
Holds
There are four holds for needle holders:
 |
 |
 |
 |
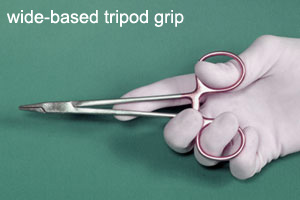
Wide-based tripod grip
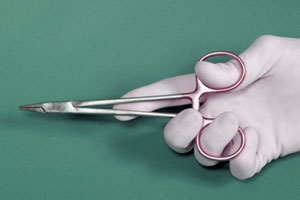
- Standard grip
- tips of the thumb and ring finger are placed in rings
- middle finger placed on top of finger ring
- index finger is placed along the handle towards the fulcrum to stabilize the tips
- wrist rotation used to drive needle through tissues
- grip provides excellent precision
- minimal movement of needle and instrument when jaws opened
- recommended for novice surgeons
Wide-based tripod grip
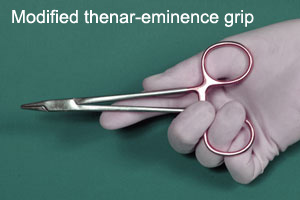
Modified thenar-eminence grip
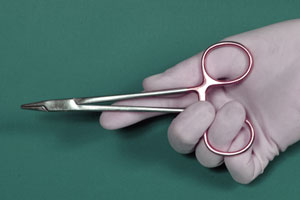
- ring finger placed through one ring
- other ring rests on fleshy pad at base of thumb (thenar eminence)
- wrist used to drive needle through tissues
- grip facilitates rapid needle grasping
- associated with some needle motion as needle released
- typically used for rapid continuous patterns when precise needle release is less critical
- some do not distinguish between this grip and palm grip
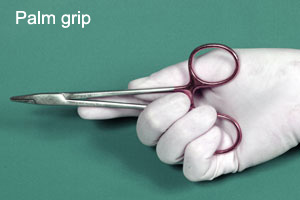
Palm grip
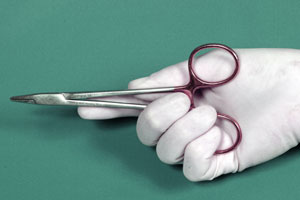
- fingers not placed through rings
- handles are held in the palm
- arm and wrist used to drive needle through tissues
- produces a strong force to drive needle through tough tissues
- less efficient and precise
- most use only when necessary
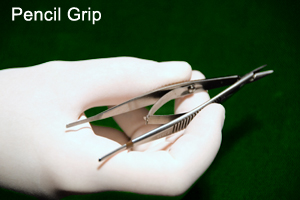
Pencil grip
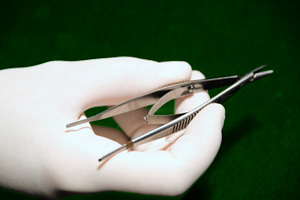
- for use with specialized needle holders (e.g. Castroviego (shown above))
- requires spring locking mechanism
- provides most precise control of needle movement
- finger generates force to drive needle (not wrist or arm)
- use resticted to fine suturing (e.g. opthalmologic, microvascular)
How to Use
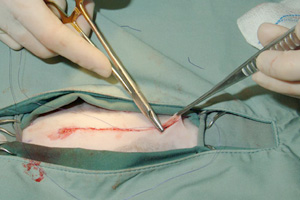
- needle is grasped perpendicular to the jaws
- placement of needle in the jaws varies with tissue thickness and density
- grasp near the center of the curve for most situations
- grasp near tip if penetrating tough tissue
- grasp near eye or swedged-on end if large amount of tissue to penetrate
- rotating the wrist while the needle is penetrating the tissue uses the arc of needle so less force is needed
- needle is extracted from tissues with needle holders if it can be regrasped in a position suitable for inserting the next bite
- if not enough needle exits the tissues, it can be extracted with tissue forceps
- fingers should NOT be used
- also used to form and tighten knots
- only the ends of the suture are used grasped to avoid damage to the main strand
Skills to Master
- holding the needle drivers with a wide-based tripod grip
- quick, controlled opening and closing of the locking mechanism
- smooth insertion and extraction of the needle in the tissues
- secure, repeatable square knot formation using needle drivers (see lab 2)
Goal
- efficient use of the needle holders while suturing (minimizing the number of motions necessary to position, insert and extract the needle, tie a square knot)
Practice:
- open and close needle holders using wide based tripod grip
- insert and extract needle from "tissues" (e.g. towel, foam)
- position center of needle arc in tip of jaws
- close ratchet mechanism 1 click
- place needle tip at desired insertion site
- rotate wrist to insert needle until approximately half of needle exits at desired location
- release the needle
- regrasp needle with needle holders in the centre of needle arc
- tissue forceps can be used to help extract the needle if necessary. Don't use your fingers.