
Instrument Ties
- most common method of tying knots
- consistent
- quick and adaptable
- efficient use of suture
Square Knot
Basic Steps
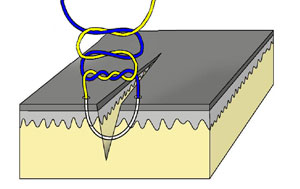
Position model so incision is vertical and yellow strand is to the left of incision
Needle holders are held in the dominant hand
Surgeon's Throw
- place needle holders on the incision
- wrap the tip of the needle holders around yellow strand TWO TIMES
- grasp end of blue strand with needle holders
- pull blue strand to left
yellow strand to right - tighten both strands with even tension keeping hands down near “patient”
Second Throw
- place needle holders on incision
- wrap needle holders around yellow strand ONCE
- grasp end blue strand with the needle holders
- pull blue strand to right
yellow strand to left - tighten both strands with even tension keeping your hands down near the “patient”.
Third Throw
- place needle holders on incision
- wrap needle holders around yellow strand ONCE
- grasp blue strand with needle holders
- pull blue strand left
yellow strand right
Additional Throws
- continue to alternate the throws (without the double wrap) until sufficient numbers have been placed to achieve a secure square knot (usually a total of 5-6 times)
- check that each throw and your completed knot is “square” and the ends lie flat
Surgeon's Knot
Basic Steps
Position model so incision is vertical and yellow strand is to the left of incision
Needle holders are held in the dominant hand
Surgeon's Throw
- place needle holders on the incision
- wrap the tip of the needle holders around yellow strand TWO TIMES
- grasp end of blue strand with needle holders
- pull blue strand to left
yellow strand to right - tighten both strands with even tension keeping hands down near “patient”
Second Throw
- place needle holders on incision
- wrap needle holders around yellow strand ONCE
- grasp end blue strand with the needle holders
- pull blue strand to right
yellow strand to left - tighten both strands with even tension keeping your hands down near the “patient”.
Third Throw
- place needle holders on incision
- wrap needle holders around yellow strand ONCE
- grasp blue strand with needle holders
- pull blue strand left
yellow strand right
Additional Throws
- continue to alternate the throws (without the double wrap) until sufficient numbers have been placed to achieve a secure square knot (usually a total of 5-6 times)
- check that each throw and your completed knot is “square” and the ends lie flat
Hand Ties
- quick, consistent tying
- useful for hard to reach places
- handy when not using a needle holder
- allows “feel” of the amount of tension applied to the tissues
- easier to maintain tightness of first throw while second is being placed
- uses more suture material
2 Techniques
One-handed (left or right handed)
Two-handed
- recommend that you learn one method first to avoid confusion between different steps (most like the one hand tie best)
- when one is mastered and can be remembered after several weeks of nonuse, another technique can be learned
- hand ties are a skill requiring regular practice to remain rapid and reliable
One-handed Ties
- preferred choice for many surgeons
- quick
- adaptable for deep cavities or confined spaces
- must be careful throws do not get flipped into half hitch during tightening
- ensure first throw does not loosen as placing second throw
Several acceptable ways to hand tie: use that which consistently works for you
- hand used varies between surgeons
- most feel more comfortable when using nondominant hand to tie
- if this feels awkward after 4-5 tries, try the other hand
|
Right Handed
|
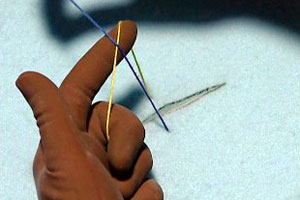
One Hand Tie: Left Handed
Detailed steps of left handed one hand tie
-
Position suture in the “tissue” as if the incision is horizontal and you are suturing towards yourself
-
to make it easier to follow the video, position the yellow strand on top and the blue strand on the bottom.
First throw
- lay the yellow suture over the open palm of your left hand
- close last three fingers (middle, ring and baby) over the strand
- make a gun with the index finger and thumb
- tuck the thumb and index fingers (the gun) under the yellow strand
- pick up the blue strand with your right hand
- place blue strand between the thumb and index finger to make a circle with the left index finger inside
- thread the index finger over the blue strand and then under the yellow strand
- flip the yellow strand through the center of the circle and pull it downwards while pulling the blue strand upwards
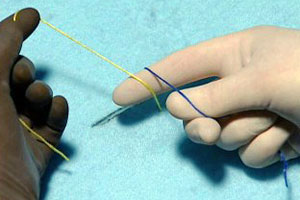
Second throw
- hold the yellow strand with the thumb and index finger of the left hand
- place remaining 3 fingers (middle, ring and baby) on top of the yellow strand
- roll your fingers over
- with your right hand, lay the blue strand beside the yellow strand to make a circle with the 3 fingers inside
- thread your middle finger over the blue strand and under the yellow strand
- flip the yellow strand through the center of the circle and pull it upwards
- pull yellow strand upwards and blue strand down
-
steps are alternated until sufficient throws have been placed to form a secure square knot
-
NOTE: Can begin the knot with either throw depending on where the needle is and how the suture is positioned in the tissue, just reverse the steps.
-
make sure when you start your hand tie that there is only one circle (not two) or you will have to cross your hands when tightening.check that each throw and your completed knot is “square” and the ends lie flat
- if there are 2 circles, change the strands in your hands or start with the other throw.
One Hand–Right Handed Tie
Detailed steps of left handed one hand tie
-
Position suture in the “tissue” as if the incision is horizontal and you are suturing towards yourself
-
to make it easier to follow the video, position the blue strand on top and the yellow strand on the bottom
First throw
- lay the blue suture over the open palm of your right hand
- close the last 3 fingers (middle, ring and baby) over the strand
- make a gun with the index finger and thumb
- tuck the gun under the blue strand
- pick up the yellow strand with your left hand
- place blue strand between thumb and index finger to make a circle with the right index finger inside
- thread the index finger over the yellow strand and then under the blue strand
- flip the blue strand through the center of the circle and pull it downwards while pulling the yellow strand upwards
Second throw
- hold the blue strand with the thumb and index finger of the right hand
- place remaining 3 fingers (middle, ring and baby) on top of the blue strand
- roll your fingers over
- with your left hand, lay the yellow strand beside the blue strand to make a circle with the 3 fingers inside
- thread your middle finger over the yellow strand and under the blue strand
- flip the blue strand through the center of the circle and pull it upwards while pulling down on the yellow strand
-
steps are alternated until sufficient throws have been placed to form a secure square knot
-
NOTE: Can begin knot with either throw depending on where the needle is and how the suture is positioned in the tissue
-
make sure when you start your hand tie that there is only one circle (not two) or you will have to cross your hands when tightening.check that each throw and your completed knot is “square” and the ends lie flat
- if there are two circles, change the strands in your hands or start with the other throw
Two-handed Ties
- most reliable method to consistently produce a square knot
- more time-consuming than the other knots
- initially more awkward in deep cavities
Several acceptable ways to hand tie: use that which consistently works for you
-
- hand used varies between surgeons
- most feel more comfortable when using nondominant hand to tie
- if this feels awkward after 4-5 tries, try the other hand
Two Hand Tie: Left-handed
Detailed steps
- position suture in the “tissue” as if the incision is horizontal and you are suturing towards yourself
- to make it easier to follow the video, have the “yellow” strand on top and the blue strand on bottom
First throw
- Lay the yellow strand over the open palm of your left hand
- Close the bottom three fingers (middle, ring and baby) over the strand leaving your index finger under the yellow strand
- With your right hand, pick up the blue strand and cross your index finger
- Pinch your left thumb and index fingers together
- Dive into the circle and from underneath pinch the blue strand
- Dive out of circle bringing the blue strand with you
- Grasp the blue strand with your right hand
- Pull the blue strand up while pulling down on the yellow strand
Second throw
- Continue pulling down on the yellow strand with the bottom 3 fingers of your left hand
- Tuck your thumb under the yellow strand and bring your thumb over the incision
- Cross your thumb with the blue strand held in your right hand
- Pinch your left thumb and index finger together
- Dive into the the circle and pinch the blue strand from underneath
- Dive out of the circle bringing the blue strand
- Grasp the blue strand with the right hand and pull it down while pulling upwards on the yellow strand
- alternate steps until enough throws have been placed to achieve a square knot
- check that each throw and your completed knot is “square” and the ends lie flat
Two Hand Tie: Right-handed
Detailed steps
- position suture in the “tissue” as if the incision is horizontal and you are suturing towards yourself
- to make it easier to follow the video, position the blue strand on top and the yellow on the bottom
First throw
- Lay the blue strand over the open palm of your right hand
- Close the bottom three fingers (middle, ring and baby) over the strand leaving your index finger under the blue strand
- With your left hand, pick up the yellow strand and cross your index finger
- Pinch your right thumb and index finger together
- Dive into the circle and from underneath pinch the yellow strand
- Dive out of the circle bringing the yellow strand
- Grasp the yellow strand with your left hand
- Pull the yellow strand up while pulling down on the blue strand
Second throw
- Continue pulling down on the blue strand with the bottom 3 fingers of right hand
- Tuck your thumb under the blue strand and bring your thumb over the incision
- Cross your thumb with the yellow suture held in your left hand
- Pinch your right thumb and index finger together
- Dive into the circle and pinch the yellow strand from underneath
- Dive out of the circle bringing the yellow strand
- Grasp the yellow strand with your left hand and pull it down while pulling upwards on the blue strand
- alternate steps until enough throws have been placed to achieve a square knot
- check that each throw and your completed knot is “square” and the ends lie flat