
Suture Patterns
There are a variety of suture patterns that can be used to close surgical wounds. As well as being able to perform the basic patterns, it important to be familiar with their basic properties so you will be able to decide when their use is appropriate.
Realize that there is often several appropriate patterns to close a specific incision.
- one may be appropriate for one species but not another
- individual patient factors may influence selection
- personal preference plays a major role in the final selection between appropriate alternatives
Interrupted vs. Continuous
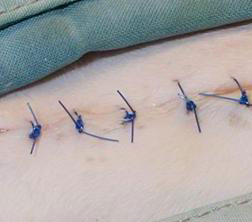
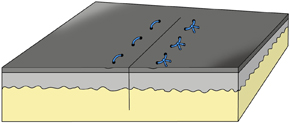
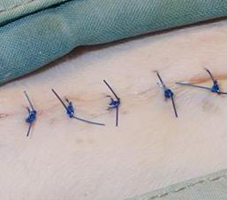
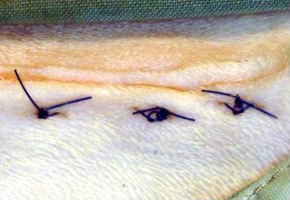
Interrupted
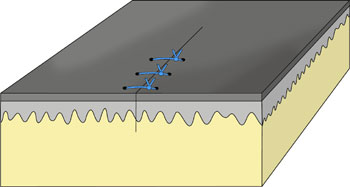
- each suture is a separate entity
- sutures can be individually positioned and tightened as needed
- more anatomic closure possible
- loss of 1-2 sutures does not usually affect the integrity of the closure
- takes more time as requires more knots
- uses more suture material
- places more foreign material (suture) in the tissues when used in deeper layers
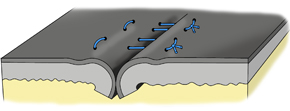
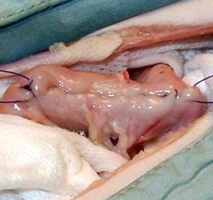
Continuous
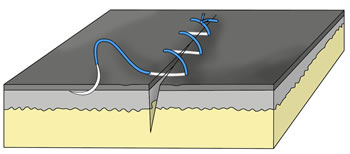
- knots only at beginning and end of pattern
- less precise control of suture tension and wound approximation
- tension is adjusted after each bite as difficult to adjust at the end
- the entire closure usually fails if one knot fails or the suture strand breaks
- knots MUST be properly tied
- avoid kinking or grasping the suture with instruments (handle the ends)
- major advantage is speed as only 2 knots
- uses less suture
- less foreign material in tissues when used in deeper layers
- better at providing an air and water tight closure
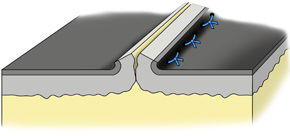
Effect on the edges of the incision
- refers to how the suture pattern approximates the edges of the wound
- the goal of tissue closure is usually to anatomically appose the wound edges. This results in the most rapid healing and return of wound strength
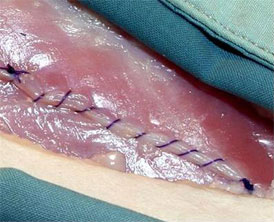
Appositional
- anatomically opposes the edges of the incision
- results in the fastest healing
- gives most cosmetic result
Inverting
- turns incision edges inward, away from surgeon
- may be desirable when closing hollow organs
- better “seal” against fluid leakage
- minimizes exposed suture and subsequent adhesions
- decreases the size of a hollow organ’s lume (avoid if already small)
- avoid in skin as delays healing
Everting
- turns incision edges outwards, towards surgeon
- results in delayed healing
- rarely indicated
Ability to manage tension acting on the incision's edges
Tension on the edges of the incision refers to the tendency of the incision to open up. A suture pattern must be able to keep the incision edges together while it heals. If there is too much tension on the incision, the suture will either break or pull through the tissue.
- some suture patterns are better able to resist tension than others because they incorporate more tissue or travel through the tissues in such a way that they are less likely to be pulled through the tissue
As a general rule, tension on an incision is best dealt with directly rather than by relying on a specific pattern. This is especially true for the skin which tolerates tension poorly. Techniques to decrease tension include undermining the tissue or moving additional tissue into the areas. This is more effective than relying on a specific suture pattern. Tension sutures are primarily used in tissues, like tendons, ligaments and fascia where there is no alternative. They may be combined with external devices like a splint to limit the forces.
Effect on the local blood supply to the incision
- a pattern’s effect on the local circulation to the incision must be considered as a blood supply is needed for the wound to heal. Preserving the normal blood supply promotes rapid wound healing
- vessels usually enter the tissue perpendicular to the incision
Remember
- Overtightening ANY suture pattern can obliterate the local blood supply
- Some species (eg. dogs and cats) swell significantly after surgery, so sutures must be placed loose enough to account for this.
Reminders
- right handed surgeons generally suture right to left or towards themselves depending on the orientation of the incision
- left- handed surgeons generally suture from left to right
- a pattern is started and finished at or just beyond the corners of the incision because the tissue’s integrity may have been damaged at this site even if it was not completely incised
- ensure you are holding your needle holders and tissue forceps properly (refer to Lab 1 if you need review)
- needle holders: use wide-based tripod grip
- tissue forceps: use pencil grip
- rotating your wrist while inserting the needle through the tissue requires less force than just pushing the needle through
- avoid handling the needle with your fingers
- tissue forceps or needle holders are quicker and more accurate (after a little practice)
- avoids perforating a glove with the needle. If this happens, both the glove and needle (and suture) are contaminated and have to be replaced
- avoid grasping the tip of the needle with needle holders as this may damage the point
- as you master control over the needle, work on inserting the needle across both sides of the incision in a single motion ( ie. the needle does not have to be extracted and reinserted in the center of the incision)
- as you practice different patterns, work on lining up the needle entry and exit points so each bite is the same size.
- check each knot to make sure it is square and has the appropriate number of throws to be secure.