Abdominal wall closure
Proper closure of the abdominal wall is CRITICAL to prevent post-surgical herniation
The simple interrupted and simple continuous patterns are both appropriate to close the abdominal wall in small animals. Simple continuous is preferred by most surgeons as it is as strong as the interrupted but is faster and places less foreign material in the incision. Because the entire closure depends on the beginning and ending knot, it is important that these be secure square knots with an adequate number of throws. Hernias are NOT more common with a simple continuous pattern but they are bigger when they occur.
A slowly absorbable monofilament like Polydioxanone (PDS II) or polyglyconate (Maxon) is generally recommended. Chromic gut should NOT be used because of an unpredicatable absorption rate. Poliglecaprone 25 (Monocryl) is NOT recommended because its rapid loss of strength may not allow enough time for the abdominal wall to regain adequate strength. If there is concern that the animal may be slow to heal, a monofilament nonabsorbable suture (eg. Nylon or polypropylene) should be used.
3-0 is appropriate for most cats this size. 2-0 could be used if there are concerns over the ability to restrict activity after surgery. The general guidelines for the size of suture material to close the abdominal wall in small animals are:
< 7 kg use 3-0 PDS
7-15 kg use 2-0 PDS
15-30 kg use 0 PDS
>30 kg use #1 PDS
** These are adjusted according to patient and environmental factors.
Technique for closing the abdominal wall
Getting the correct bites
Identify the linea alba and external rectus sheath every bite? Test (PDF)
Answer (PDF)
-
- do NOT mistake the subcutaneous tissue (or the preputial tendon in male dogs) for the external rectus
- if the incision is centered on the linea alba, include some adjacent external rectus sheath in bites for maximum strength
- needle should hesitate slightly as pass through the thick external rectus fascia (if don’t feel, check carefully to ensure have not missed it
- include the very ends of incision as this area may have been weakened while making the incision
- take adequate bite (5-10 mm) of external rectus fascia or linea alba on either side of abdominal incision.
-
- avoid large amounts of muscle as adds minimal strength and decreases apposition
- avoid fat (falciform or subcutaneous) as prevents healing
- if bites properly spaced apart, should NOT be able to insert forceps into the abdominal cavity
- tie secure square knots.
- weakest part of suture pattern is the knot
- place appropriate number of throws for material and pattern (eg. one extra throw at beginning and 2-3 throws extra at end of a simple continuous pattern) to ensure knot security (see lab 2 to review knot security and required number of throws)
- ensure each throw is square
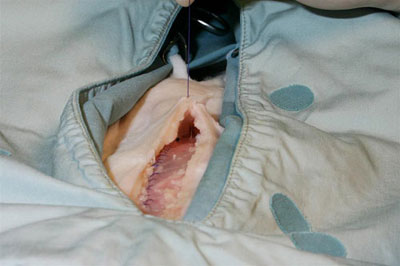
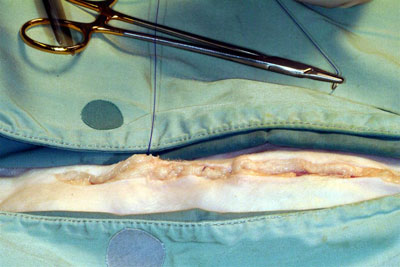
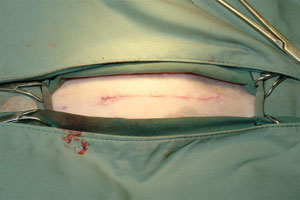
Closure of the subcutaneous tissue
Goals
-
- close the dead space preventing seroma formation. See picture.
-
- additional security and improved strength of the entire closure
- approximate the edges of the skin incision so that the skin can be closed with minimal tension
- omit this layer in cats if there is minimal dead space
- closure of the subcutaneous tissue in cats is associated with a higher incidence of suture reactions especially if excess fat is included in the closure
NO, including this layer in the closure provides no additional strength, increases the amount of inflammation during healing and prevents the accurate apposition of the skin edges.
YES, including this portion of the subcutaneous tissue is important to close the dead space. Avoid including the external rectus sheath so that gliding motion between the two layers is preserved (are more comfortable post-op as well).
The dead space present when it is not closed
The two most popular choices of closure are:
- simple continuous
- continuous mattress
The choice between these patterns is largely one of personal preference.
A rapidly absorbable monofilament like Poliglecaprone 25 (Monocryl) is a good choice as this layer heals quickly so the suture support is not needed for very long. Other absorbable sutures could also be used.
Either a taper or reverse cutting needle can be used.
4-0 is appropriate for most cats this size. environmental factors.
Procedure/Tips for subcutaneous tissue layer
- right-handed surgeons typically suture from right to left (are on right side of the animal)
- left-handed surgeons are usually on the left and suture from left to right
- handle the subcutaneous tissue not the skin
- avoid grasping the skin with tissue forceps to minimize trauma and bruising
- knots are buried at the beginning and end of the layer
- properly burying the knots minimizes irritation from the knots and subsequent licking, suture reactions and infection
- to review the steps see lab 4
- use a series of superficial and deep bites
- superficial bites of subcutaneous fascia to appose skin edges
- deep bites of the fascia to close dead space
- avoid incorporating rectus fascia in bites to preserve gliding motion of skin
- avoid central area of fat
- diminishes apposition
- adds no additional strength to closure
- may increase amount of suture reactions especially in cats
Skin incision
Goals
Anatomically appose the skin edges to- Prevent contamination of the deeper layers
- Ensure cosmetic healing
- the more anatomical the apposition, the more cosmetic result (smaller scar)
The intradermal or interrupted appositional patterns are common choices.
- intradermal is popular
- very cosmetic closure
- all of the suture is hidden and therefore inaccessible to the animal
- suture removal is not required (saves a trip to the clinic)
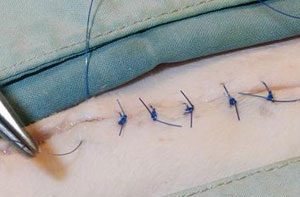
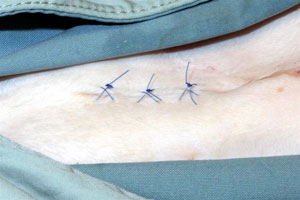
- Simple interrupted or cruciate patterns are common choices of interrupted appositional patterns in small animals
- provide a cosmetic closure with the security of an interrupted pattern
- require removal but this provides an opportunity to evaluate the animal’s progress after surgery
- Minimal tension on the incision means the tension patterns (eg. horizontal or vertical mattress or near-far patterns) are not necessary
- Most avoid continuous appositional patterns in skin because region very accessible to the animal and damage to the strand or knots by chewing would result in failure of the entire closure.
- final choice is personal preference.
For the intradermal, an absorbable suture material is indicated. A monofilament is typically preferred because of decreased tissue drag. The skin heals rapidly so a rapidly absorbable suture, like poliglecaprone 25, can be used.
For skin sutures (simple interrupted or cruciate), a monofilament nonabsorbable material (eg. polypropylene, polybutester or nylon) is a good choice.
4-0 is an appropriate size of suture for cat skin.
A reverse cutting needle is used for both intradermal or skin sutures to make it easier to penetrate the skin.
Intradermal pattern
-
- Knots are buried at the beginning and the end of the pattern
- poorly buried knots are frequently associated with excess licking, irritation and increased infection rates.
- Knots are buried at the beginning and the end of the pattern
- overlapping successive bites improves the cosmetics of the closure (second bite starts about 5 mm behind when the previous bite exited)
- Use thumb and index finger to stabilize and turn skin edge out to avoid trauma induced by firm grip of the tissue forceps
Skin Closure Technique
- bite size
- a bite equivalent to the thickness of the skin (3-5 mm) on either side of the incision is standard recommendation
- most prefer a minimum of 5 mm to place the suture outside the area involved in the inflammatory phase of healing
- determining the proper tightness of the skin sutures is an art
- tight enough to appose the skin edges (ideally have done this with the subcutaneous closure so is not a factor)
- loose enough to accommodate skin swelling after surgery tight skin sutures is more significant in small animals as they swell more and do not hesitate to chew out painful tight sutures.
- should be able to easily insert a mosquito hemostat under the finished suture
- should be able to easily insert a mosquito hemostat under the finished suture
- sutures are spaced a distance roughly equivalent to entire bite through skin