
Knots are buried below the surface for some closures.
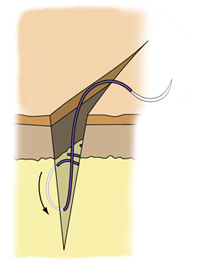
Burying the beginning knot of continuous pattern
Step 1
- begin inside the incision on one side
- insert needle from deepest part of the tissue to exit near surface of the layer
ie "deep" to "superficial"
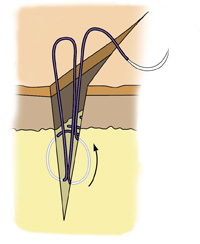
Step 2
- on opposite side of incision
- insert needle from superficial part of tissue to exit in deepest part of the layer
ie "superficial" to "deep"
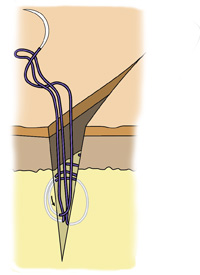
Step 3
- tie ends in secure square knot
- if simple interrupted pattern, cut both ends
- if continuous pattern, cut one end and continue on with other
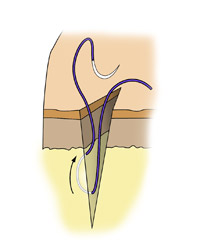
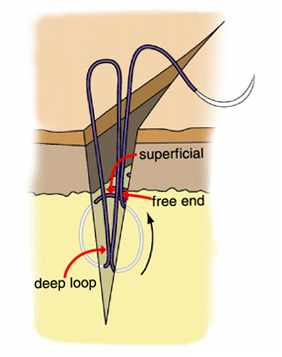
Burying the end knot of continuous pattern
Step 1
- stop continuous pattern about 1 cm from end of incision
- on one side of incision pass needle from surface of the layer through the tissue, to exit in deepest area
ie "superficial" to "deep"
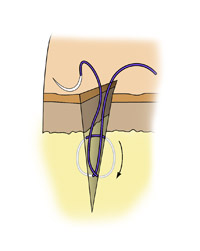
Step 2
- on other side of incision, pass needle from deep region through tissue to exit near surface
ie "deep" to "superficial"
- leave loop exposed (do NOT pull it tight)
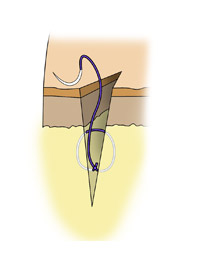
Step 3
- on first side of incision, pass needle from surface of the layer, through tissue, to exit in deepest part of tissue
- exit close to loop from Step 2
ie "superficial" to "deep"
Step 4
- tie deep loop to the end
- cut both ends
Tips
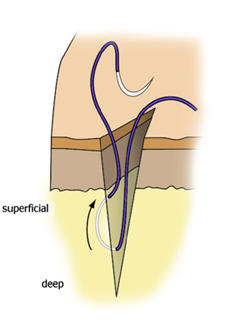
- Each end being tied must be located in the tissue as far from the surface as possible( “deep”). The deeper the ends are placed, the deeper the knot buries.
- Bites also contain a part near to the surface of the tissue (“superficial”) to close the surface of the tissue over the knot.
- Because the incision is not as deep at its ends, placing the knot several millimeters from the ends allows it to be buried deeper.
- When burying the end knot of a continuous pattern, both the deep loop and the deep end must be on the same side of the superficial loop or the knot will not bury.
- Pulling the ends parallel to the incision when tying the knot(rather than across it) helps tuck the knot deeper in to the tissue.
For which tissue layers or what circumstances, do you think it would be appropriate to bury the knots of a suture pattern?
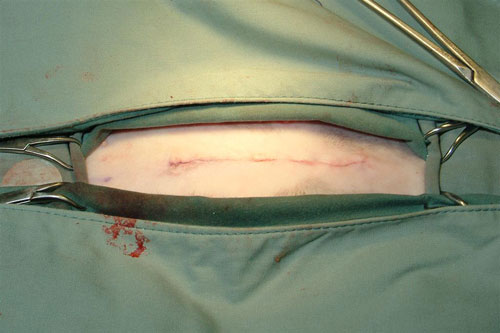
For skin sutures, the knots are NOT buried. A minimally reactive monofilament absorbable suture is used and knots are placed on the surface to minimize the amount of foreign material buried in the tissues. Sutures are removed in 7-10 days. While generally they provide a very cosmetic closure, animals will occasionally lick or pull them out, especially if they are placed too tight.
For the intradermal closure, the knots are buried. This avoids having the knots protruding through the edges of the skin incision where the animal is able to lick or chew at them. It also prevents access of dirt and bacteria from the environment to the deeper layers.
For the subcutaneous tissue, the knots are generally buried. This avoids having the knots protruding through the edges of the skin incision where the animal is able to lick or chew at them. It also prevents access of dirt and bacteria from the environment to the deeper layers.
Knots for patterns closing the abdominal wall are not buried as knots or suture ends can cause trauma to abdominal organs like the spleen or intestines. They do less trauma when placed in the subcutaneous tissue.
Knots are usually placed on the surface of the intestine. The small size of suture used and quick adhesion of omentum to the site minimizes any local trauma.
Knots of inverting patterns on hollow organs can be buried to minimize trauma to adjacent organs and adhesions (primarily equine). Knots are placed outside the lumen but under the surface of the tissue being inverted.