
The basic steps to perform an ovariohysterectomy are standard but there are various ways to perform the individual steps. This section will present only one but you are encouraged to try the various modifications to find what works best for you.
Review of anatomy
Anatomy Review
- Ovaries located dorsally just caudal to the kidneys
- Suspensory ligament runs from the ovary to the transversalis fascia just medial to the last rib. It is palpable as a firm band that travels craniolateral from the ovary.
- Proper ligament fascial thickening attaching the ovary to the uterus
- Ovarian vessels: arteries come directly off the aorta caudal to the renal arteries. The right ovarian vein drains directly into the vena cava while the left ovarian (or testicular) vein drains in to the left renal vein.
- Uterine horns travel from the ovaries in a caudal direction and join to form the uterine body which lies between the colon and the bladder
- Uterine body sits between the bladder and the colon
- Broad ligaments suspend the uterus from the dorsal body wall
- Uterine vessels are branches of the vaginal artery that come off the internal pudendal branch of the internal iliac arteries
- Bladder
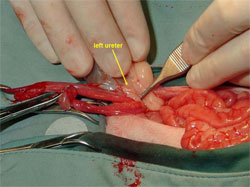
- Ureters travel under the peritoneum from the renal pelvis to the bladder. Can be injured if care is not taken in placing clamps or manipulating tissues in these areas.
- Mesoduodenum mesentery connecting the duodenum to the dorsal abdominal wall and root of the mesentery
- Mesocolon mesentery connecting the colon to the dorsal body wall
Left Ovary
Right Kidney
Anatomy check: Make sure you can identify these common structures and are familiar with their locations
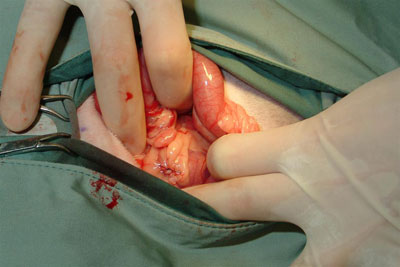
Locating the uterus
Finding the female genital tract blindly through a small incision can sometimes be challenging. Having a good picture in your mind of where it is located can help find it with less “gut puddling”
Location:
- Ovaries are situated just behind the kidney in the dorsal aspect of the abdominal cavity
- Uterine horns travel from the ovaries caudally before joining to form the uterine body which lies between the colon and the bladder
- Usually a uterine horn located blindly by inserting a finger along the abdominal wall midway between the ovaries and the uterine body. (ie. roughly halfway between the umbilicus and the pubis).
Using the index finger
Using a spay hook
Once the uterine horn is located, it is followed cranially to the ovary or caudally to the uterine body and the other uterine horn
Breaking the suspensory ligament
- suspensory ligament runs from the ovary to the transversalis fascia just medial to the last rib. It is palpable as a firm band that travels craniolateral from the ovary.
- It is important to break the suspensory ligament so that the ovary can be exteriorized
- Why? Explanation: Bringing the ovarian pedicle outside the abdominal cavity to place the clamps and ligatures protects the nearby structures from accidental injury by instruments or manipulation.
-
Which structures could be damaged? ureter, intestines or spleen
Technique for breaking the suspensory ligament
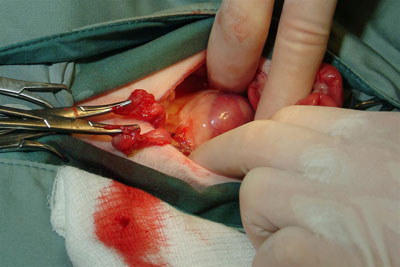
Ovarian pedicles
The 3 clamp principle
- used for ligating pedicles during a spay
- NOTE: while placement of the 3 clamps (Carmalt or mosquito hemostats depending on patient size) is important, they do not all have to be on at the same time (varies with surgeon preference)
Procedure begins by making a window in the broad ligament
1st clamp:
- placed at abdominal base of pedicle
- purpose:
- isolate and exteriorize pedicle
- crush tissue to remove fat
- create a groove for ligature to securely sit in
- removed as ligature is placed and tightened
2nd clamp:
- placed above (closer to ovary) first clamp
- must not include ovary (place fingers on ovary to ensure not included in clamps)
- purpose:
- facilitate cutting of pedicle
- keep pedicle from retracting into abdomen after cut (allowed controlled release)
3rd clamp:
- placed either above second clamp or across proper ligament on uterine side of ovary
- must not include ovary
- purpose:
- helps manipulate ovary
- stops hemorrhage from the ovarian/uterine side of pedicle after cut
Clamping Left Ovary
Steps to ligating the ovarian pedicles
- Exteriorize the ovary
- Make a window in the broad ligament
- Clamp the pedicle using the 3 clamp principle
- principle universal
- specific steps used vary with surgeon’s preference
- place and tie ligature
- The ligature is placed around the first clamp and tightened as the clamp is removed
- one effective and secure ligature is sufficient
- 2 ligatures can be used for safety until experience with ligatures is gained
- transfixation ligature* used when vessels are large or surrounded by a lot of fat
Steps to ligating the ovarian pedicles
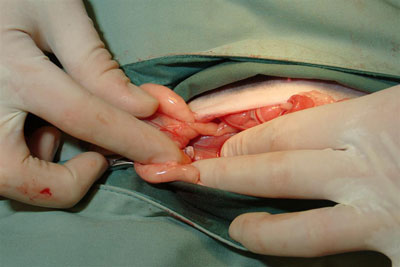
- Cut pedicle
- Release pedicle
- grasp pedicle with fine tissue forceps between the second clamp and the ligature
- Why not grasp below the clamp?
Explanation: because tissue forceps could traumatize the vessels resulting in hemorrhage. - slowly lower pedicle into abdomen
- release if no hemorrhage
Replace Left Ovary
- Repeat process on other ovary
What would be an appropriate suture material and size for ligating the ovarian pedicles in a 4 kg cat?
Ligating the uterine body
1. Tear the broad ligaments to the level of the cervix
Where are the bladder and ureters located relative to the uterine body?
Explanation: It is important to ensure the uterine body is exteriorized to avoid trauma to the ureters by the clamps or ligature and to make sure the uterine horns are not wrapped around the bladder neck. Note: bladder is exteriorized for demonstration, this is not normally done
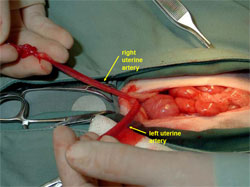
Where are the uterine vessels located?
Explanation: vessels run along the lateral aspects of uterine horn and body
See labelled picture (PDF)
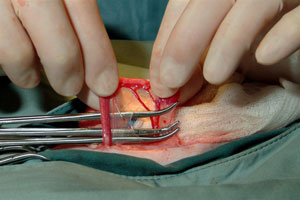
2. Clamp the uterus using the 3 clamp principle
-
- first clamp on uterine body just cranial to cervix
- second and third clamps are placed cranial to it
- stop if note tissue tearing
- many chose not to clamp in cats as uterus is more friable * and may tear or if animal is in heat
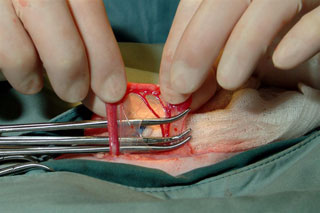
3. Ligate the uterus
4. Cut uterus
5. Release the pedicle
Checking for hemorrhage
Visually check each pedicle for hemorrhage
isolate and visualize each pedicle every time you perform a ovariohysterectomy until you can consistently find them quickly (< 10 seconds).- Every surgeon experiences significant hemorrhage from a stump at least once
- Can occur when
- a pedicle tears or a ligature is loose or slips off
- this is NOT the time to learn how to find them quickly.
Mesocolon is used to retract intestines to right, look just caudal to left kidney mesocolon
Mesoduodenum is used to retract intestines to left, look just caudal to right kidney
Bladder is retracted caudally to look between it and the colon in the region of the pelvic inlet